Showing posts with label picnic. Show all posts

January 8, 2012

Pip's Mexican Style Chicken


***************

This is really easy to make.  I get the chillis I need from Casa Iberica.

1 kilo of chicken thigh fillets, no skin, fat trimmed

To Make The Marinade
2 dried guajillo chillis : seeds removed and snipped into pieces with scissors
1/2 chipotle chilli (I use the chipotle which are tinned in adobo sauce.... and I add a teaspoon of the sauce)
1 tablespoon of ground sweet paprika
1/2 tablespoon of ground cumin
1/2 tablespoon of dried oregano
1 tomato, chopped roughly
1 red onion, chopped roughly
2 cloves of garlic, peeled and chopped
juice of one lemon
2 tablespoons of olive oil
1 tsp of salt
1 tsp white pepper

Put all these ingredients in a food processor and pulse until it's a nice red paste.  You can use a mortar and pestle for this if you like, but I shake all the crockery out of the cabinets if I do.  Don't do that, will you?!  Scoop it all out into a bowl and throw your chicken in for at least 2 or 3 hours to marinate!  

To cook the chicken, heat a slosh of olive oil in a nice, big heavy based pan.  Plonk the chicken in and arrange it neatly  in one layer.  Pop a lid on and simmer over a medium low heat for 20 minutes.  You can turn up the heat at the end if you want a bit more colour on your chicken.  Cut the chicken into pieces while it's still in the pan and toss in the pan juices. 

You can season it with black pepper, coriander and a squeeze of lime to serve!

We have this in tortillas, usually, with lots of fresh salsa, guacamole and crunchy greens!
It's good with spiced rice and corn on the cob too!

Pip's Lamb Rolls


****

Pip's Mayo
2 egg yolks
1 tbsp of Dijon mustard
1 tbsp of Worcestershire Sauce (Lee & Perrins is good!)
1 tbsp of red wine vinegar
juice of half a lemon
a slosh of tabasco
a pinch of salt
a pinch of black pepper
1 cup of good quality oil (I used a mild olive oil, but you can use canola oil if you like!)

I use a food processor to make this, but you could use a regular mixer or do it by hand with a whisk if you are very energetic.  To make the mayo, plonk all the ingredients EXCEPT the oil in the food processor.  Blend or beat until well combined.  Now keep the motor running and slowly, slowly, slowly drizzle the oil in.  The mixture will thicken up nicely as you drizzle and spin.  You must do this slowly, or else the mayo will split and go runny!  Ick. We don't want that.  Slowly, slowly we go.  Once you've added all the oil, add a tablespoon or two of boiling water to lighten the texture and colour a bit.  Voila!  (Makes 1 cup of Pip's Mayo!)


Pip's Lamb Rolls
Serves 4

300g of lamb fillets (I used 'backstraps')
Marinate these whole for at least 15 minutes in :: two tablespoons of olive oil, 1 tsp of dried oregano, 1 diced clove of garlic, 1 tbsp of red wine vinegar, salt and pepper.

Next, sear the lamb fillets in a hot pan, first on one side and then on the other. Once they have lots of colour and smell delicious, put them in a hot oven for five minutes or so to finish them off.  They should still be a bit soft to touch when you take them out, if you are after pinkish lamb.  Cover them with foil for a few minutes so they can rest and relax.

Now we need
4 soft long rolls, split down the middle (but not all the way through!)
1 large tomato, sliced with some basil sprinkled atop it, if you like
1/2 cucumber, sliced
1 handful of baby spinach or rocket (washed and dried!)

Slice your lamb fillets as thinly as you can.  I'm not much good with a knife, but mine were a BIT thin.  Now spread your roll with lots of mayo.  Pop in the lamb next, then the tomato and cucumber.  Finally squoosh in the spinach.  Season with salt and pepper and gobble them up!

Also :: You can add feta, avocado, chili, pesto or capers

Simple Mexican Potatoes


1 kg of unpeeled roughly chopped potatoes
1/2 cup extra virgin olive oil
1 tablespoon of sweet paprika
1 teaspoon of dried oregano
juice of one lemon
optional : 1 tsp of chipotle powder

Toss all these ingredients together and make sure the potatoes are well coated in the oil and herbs and spices (and lemon juice!)  Tumble onto a heavy based tray and bake in a HOT oven for 35 minutes (until nice and golden and tender and crunchy!) Season with salt and pepper.
Serve with salsa or mayo or yoghurt if you would like that!

May 10, 2011

Tessa Kiros Tomato Lasagna

My version of Tessa Kiros' Tomato Lasagna

Tomato Sauce
1.25 kg of tinned diced tomatoes
3 cloves of garlic, crushed
a good slosh of olive oil
one cup of warm water of stock
bunch of fresh basil or a teaspoon full of dried Italian herbs

8 sheets of instant lasagna (the dried one) : I used one family sized packet : about 350g
250g Parmesan

Bechamel Sauce
1 litre of warmed milk
3/4 cup of plain flour
120g of butter
nutmeg

Make the Tomato Sauce First
Heat the oil and gently fry the garlic till it's fragrant (not browned!) Throw in the tomatoes. Cook for 15 minutes, and then add 1 cup of water (or you could use stock!) Season with salt and pepper and then simmer it on a low heat while you make the Bechamel sauce. (You are meant to puree it, but I didn't, because I am lazy and I don't like too many dishes!)

Make the Bechamel Sauce Next
First warm your milk. Then in a separate large-ish pot melt the butter. Once the butter is melted, add the flour and whisk like crazy to make a smooth butter and flour paste. Continue to stir the floury butter over the heat for a few minutes to cook the floury taste away. Now start whisking in the warm milk a slosh at a time. Don't stop whisking! Your Bechamel will end up nice and thick and smooth. Good work. It needs to be thick so that it layers nicely.

Assemble it All
Grease a lasagna suitable dish or just slosh some oil and and coat the dish well with it using a pastry brush or your fingers. My dish was around 20cm x 30cm and quite deep. Slosh a layer of Bechamel sauce in first and spread it over the base. Put two sheets of dried lasagna atop the Bechamel. Now layer tomato sauce, then Bechamel, then Parmesan, then lasagna. Do that two times. Then add a final layer of lasagna and top with Bechamel, more Parmesan and dot with any leftover tomato sauce.

Cook in a 360F/180C degree oven for 30 minutes until golden and cheesy.

Eat it all up!

Serves 6

November 12, 2010

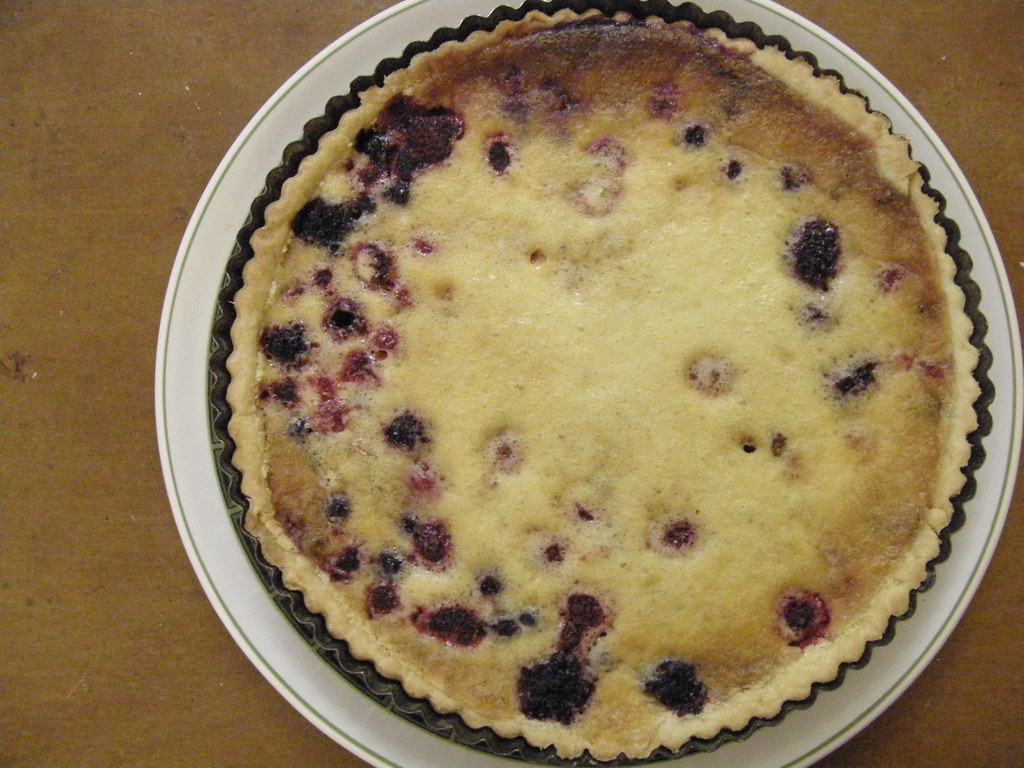
Vanilla Berry Tart

Vanilla and Berry Tart


Vanilla and Berry Tart


img032

Click to see larger!

Cakey Pear Tart Tatin

Pear Tart Tatin Cake

Cakey Pear Tart Tatin

Cakey Pear Tart Tatin

Not Too Bitter Chewy Chocolate Brownies


We made these brownies yesterday. My kids are pretty picky with their brownies. They like them with crunchy tops and fudgy-chewy bottoms.  They like them chocolate-y but not bitter.  It is quite hard to make them JUST like that, but these brownies are JUST like that. They are not wet or cakey.  They are a bit moist and a lot chewy.

A LONG time ago... maybe eight years ago, there was a REALLY GREAT recipe in 'The Age' for Brownies. If you have that could you let me know.  I want to try it again and somehow it got thrown out... sigh.   If you have a copy neatly filed away I would KISS you.  I would.  I am a bit sad I don't have that particular recipe because it was Max's favourite.   Having said that, he thinks these Brownies are JUST as good.  Maybe you would like to make some too?  Here is the recipe, my dears!

****************

Not Too Bitter, Chocolate-y, Chewy Brownies
Adapted from this Cook's Illustrated Recipe

1/3 cup of good quality cocoa
150ml boiling water
60 grams dark chocolate pellets PLUS
3/4 cup of dark chocolate pellets
200g melted unsalted butter
2 eggs PLUS
2 egg yolks
2 tsp vanilla extract
2 1/2 cups of sugar
1 3/4 cups of plain flour
1/2 tsp salt
Spray on Canola Oil or extra butter and a pastry brush

Preheat the oven to 350 degrees.  You need a pan around 30cm x 9cm. I used a Pyrex one, but you could use a tin, for sure.

Prepare your pan first. Line it well with two layers of foil. The edges of the foil should rise up a bit higher than the edges of your pan so it's easy to get the Brownies out later.  Make sure the layers are nice and neat and completely covering the surface of the pan and pushed well into the corners. Now spray VERY VERY well with oil or paint VERY VERY well with melted butter and a pastry brush.  This is very important!  You do not want your sugary brownies to stick to the foil!  So go carefully and do a good job of this!

Put the boiling water in your mixing bowl and add your cocoa.  Mix quickly until smooth and then quickly add (one by one) the 60g of chocolate, melted butter, the eggs and egg yolks, the vanilla and the sugar, mixing well after each addition.  Next add the flour and the salt and then fold in the remaining 3/4 of a cup of chocolate.

Pour into your foiled and greased tin and bake for 30 to 35 minutes, or until a skewer or toothpick comes out clean when poked into the centre of said Mega Brownie.

YOU MUST allow these to cool fully before you cut them.  The longer you wait the chewier they will be, but DO NOT cut them before they have cooled.  There is cool brownie-chewy-magic going on!

****************


Let me know how you go... or post your favourite Brownie recipe in the comments (if you would like to!)

xx Pip

Easy Mix Butter Cake


Easy-Mix Butter Cake
Favorite Cakes
Card 14


Hi!

When I was a wee gal, I used to come home from school to THIS VERY cake.  I loved it. Sometimes my Nan used to sprinkle jelly crystals on the top, you know, the powdered jelly? Yes, that.  Always Raspberry or Strawberry flavoured. Golly. I just remembered that as I typed this.  I am going to make this again with Jelly Crystals on top of it. Wow.  But it is really great with 100s and 1000s or sprinkles too.

This cake was EASY to make.  It was lovely and light.  I used the Kitchen Aid.  And I did burn the edges a teensy bit, but that is because my oven only has HOT or NOT kind of temperatures.  So it was a teensy bit HOT!  Oops. The dog got the ends and she was VERY happy!

I love this cake as much as I love my Nan. I think it is a simple cake with a lovely crumb and a golden crust.  I say go forth and make this.  You will like it. Yes you will.  It is lovely and light and humble. Just my kind of cake.

xx Pip

Toffees


Homemade Confectionery
Card 19
Toffees

Have you ever cooked from this recipe card?  As a child I was FOREVER making toffees. It is a credit to my mother that she let me play with boiling sugar.  Mum, I salute you.  Sometimes I rushed these and they were grainy and awful and cloudy. Sometimes I didn't rush them and they were clear and amber and wonderful.  Sometimes I added way too much food colouring to these.  Sometimes I let them cool too long and the 100s and 1000s would not stick to the surface and my toffees were naked.  We made these for fetes that happened and some fetes that never happened because we licked all the toffees and there were none left.  Do you remember that the paper stuck to the toffee and you had to determinedly assure everyone that the residue of the torn paper on the sides of the toffee actually tasted REALLY nice?

I made these AWW toffees yesterday. They work perfectly.  Here are some extra tips for your toffee making pleasure  ::


  • These would be BEST made in those little petit four cases so they are not too huge and teeth achingly impossible to get through. Tiny toffees would be best. (But I made big ones!)
  • Make sure you put paper down and protect your surface when you are spooning the toffee into the paper cases : you can easily clean it all up then and will not be chiselling toffee off your counter tops till the cows come home.  
  • It's important to make sure that you DO let the bubbles subside and make sure the toffee is nice and clear before you pour it, if you want lovely clear toffees, that is. 
  • Do make sure you don't let them cool too long before you decorate them.  
  • Work quickly because the toffee thickens up and hardens quite quickly.
  • Don't worry if you have little spills or toffee threads because that is considered artistic.
  • When you are done fill up your toffee pot with water and boil it and your spoon to get rid of that hardened toffee.


Do you have any stories about these toffees? Or toffees in general?   Do you love the original AWW photo as much as I do? I used to stare at this card as a little girl and wish the toffee fairy would visit us. It's true. How about you?!

xx Pip

Family Chocolate Cake


Favorite Cakes
Card 22
Family Chocolate Cake

OKAY!  So this is a recipe that lots of people mentioned when I first announced this project.  I made it today (early this morning, in fact) with the Caramel Icing (as above.)  I think it would be extra nice with Chocolate Icing as well.  Max thought this cake was quite nice.  He said he would prefer it if this cake was rich and chewy and chocolaty like a brownie.  It isn't those things, but it is a nice light tea cake.  Not very chocolaty though.  You could add lots more cocoa, I think, and chocolate icing, and that would placate the Chocolaty People.  Ari did not really like the icing.  But Max did. So go figure.  Maybe chocolate icing is the safest option here?!

Personally, I think it is really nice as is. Cam liked it too, and he thought it was nice and moist.  He said he hates dry cakes.  This cake is  not dry. Phew.  It is lovely and moist with delicious caramel icing.  That is what it is. Yum.

Points to note ::
The caramel icing took a bit more icing sugar than mentioned to make the icing thick enough, so watch out for that and have a bit extra on hand, perhaps.  You will note that I made this in a heart shape.  That is because I did not have a big square tin, and also because I like hearts.  I lined it well with baking paper and greased it super goodly.   You could make a heart cake too, if you wanted to.  I think it is nice to defy convention and use fancy tins.  Perhaps you have a tin in the shape of a bowler hat, or a monkey, or a bottle of whiskey.  Those would all be great options too.  Or just make a square and ignore my silly tin fetish.

Is this cake part of your culinary history?! Did someone in your family make this cake for you?  We would LOVE to know more.  Tell us!

xx Pip

Meatloaf In BBQ Sauce


Best Beef Recipes
Card 22
Meatloaf With Barbecue Sauce

When I was about 15 I used to cook this for my family (along with Tuna Ring... good grief!) with great success.  Probably my Mum was just relieved someone else had got off their bottom and had a go at making dinner...?  That said, it seemed like a good idea to step back to 1985 and cook this dish for the family again.   It can be nice to revisit those old faves, don't you think?  (Although sometimes those old faves don't really translate into new faves.)   So cook this I did.  And...

...The verdict is that..... we liked it.  It was good!  You might like it too, if meatloaf is your thing.  There was a teensy problem with the sauce being a bit too vinegary and strong.  Ari was not much into the sauce, but apart from that he thought it was delish. Perhaps just a splash of vinegar might be better?

I confess we did change the recipe a tiny bit because I could not stomach the idea of eating sausage mince.  We substituted pork and veal mince for the sausage mince.  I know it's not strictly AWW, but I have to draw the line at some things and sausage mince is one of them. Yick-attack.  Here is the line... and the sausage mince is WAY over there... far, far away.

We served this with our standard big bowl of green peas, corn, fresh tomato sauce... and I made some mash too.  Yum.  Max commented that meatloaf is a great meal because you can have it the next day in sandwiches.  Max, I totally agree.  You are so right.  I think I like meatloaf in a sandwich with some chilli or chutney even more than I like meatloaf with peas and mashed potatoes.  Yep.

Do you fancy a meatloaf sandwich?  Do you like meatloaf? Do you hate it? Have you made this?  Do tell!

xx Pip

BTW : Did you watch the premiere of  'Offspring'?  I downloaded it today via iTunes and watched it this morning after my jam-seeking visit to the Windsor Deli.  I think it's going to be a really great series... I love a local production and most of this show is shot around the streets of Fitzroy... the first episode features Radio on Gertrude St and The Union Club Hotel and Cottage Industry... Cool! (Plus lots of other places like The Black Cat and Carlton Gardens...)

Orange Cake


click to enlarge


Favorite Cakes
Card 13
Orange Cake

Ooh it has been a while since I posted a Yellow Box recipe... That has more to do with the fact that I haven't taken photos of the recipe cards, rather than the fact that we haven't been Yellow Box-ing. Because we HAVE been Yellow Box-ing!

So here we have the Orange Cake!  This cake was quite yummy.  Either I cooked it for too long... or it was badly in need of a syrup... perhaps the first, because it was a bit dry.  I hate a cake that is not quite cooked, so I think maybe I did err on the side of caution and cook this a bit long... (be careful not to do that, if you make this cake.)

This cake is a real old fashioned tea cake. It will keep for an age, I reckon.  Maybe a week or more.  I decided to fancy up the icing a bit, and added some Mandarin Zest, which gave it a nice lift.  This glace icing is the sort that sets, so you can wrap it in cling film and the plastic won't stick to the top. I think that makes it a good cake to take to a friend's house, which I did.  (The friend thought this cake was nice.)

While I was icing this, Ari told me too much icing is a bad thing, so I did not completely smother it as I usually do.  He was quite mortified that I slowly tipped the icing on and let it flow volcano style.  He thought I should spread the icing carefully. Hmm.

So what do you think?  Too much icing a bad thing? Tip or spread?  Is this a cake your Nan used to make?

xx Pip

NB :: More on Project Yellow Box here....


:::::::::


Hamburgers


Best Beef Recipes
Card 11
Hamburgers

When we were kids, our Mum and Dad often took us on day trips to the pebbly, shallow beaches which dot Tasmania's South East Coast.  The drive seemed to take forever (must have been 40 minutes or so : wowee!) and we were always so pleased when we finally arrived and we could run along the water's edge while our parents dragged the barbeque out of the back of the Mazda wagon and started flipping burgers and popping cans of Tarino or some such.

So here, in honour of those happy days,  we have burgers. Not the beach burgers of my childhood, but burgers all the same.  I made these last weekend. They were really great, although I made them a bit too thick, so I had to cook them carefully for quite a long time.  I think you should make thinner ones, if you make them.  See the picture?  Maybe half as thin as that would be good.

We had these with Windsor Deli sauces, french fries and lots of salad in sesame buns.  We did not toast the buns.  Do you toast your buns?  Do you have a favourite burger recipe?  Do you have burger night at your house?

xx Pip

NB :: Click recipe to enlarge :: More Project Yellow Box recipes here


Health Potato Salad


Super Salads
Card 1
Health Potato Salad


Hello!

I must admit I have a total adoration for potato salad.  I love it. In a sandwich ideally with some chilli and lots of salt and black pepper.  Or white pepper even. I love white pepper.  I know it's considered a bit daggy, but it is a really lovely addition to something needing a bit of a boost. Don't underestimate white pepper, my friends.  Sometimes I make a really simple potato salad with some boiled potatoes, a gloop of mayonnaise, a diced avocado and some spring onions and lemon juice. Yum.  If you like potato salad, you should try that, it's super good.  You can even mash the avocado with the mayo first, if dicing seems to green and messy.  That works really well too.

This recipe is called Health Potato Salad.  Yep.  Cam made this one night last week.  We had it with chicken made the Nigella way, which involves cutting the chicken down the backbone and squishing it flat, marinating it with nice things and then popping it in a medium oven until it is nice and golden and delicious.

I really like this herb filled salad, it's real Summery picnicky happy day food.  I confess I did not even eat any chicken, I just had the salad in one of those yummy Vietnamese rolls with chilli sauce.  It was tres yum.  Do you think that is yum? Do you like potato salad?  Will you make this? Or is this always on the table at your family bbq, already?

xx Pip


:::::::


:: Coconut Ice


Homemade Confectionery
Card 1
Coconut Ice


THIS was one of my superfaves when I was a kid! Did you love coconut ice?!  Did you?!  I love it still.  I do!  Yes!

 I made the second recipe :: Creamy Coconut Ice :: and yes it does have COPHA in it!  Maybe that will freak you out?  Oh well.  It is delicious.  We have all been eating it all afternoon, although Emma was not at all into the COPHA idea and she just had her garish fruit cake instead.  She does NOT know what she is missing out on!

You probably know that there is a different coconut ice recipe which has condensed milk in it.  I like that one too, because I get to eat the leftover condensed milk from the can.  I love condensed milk.  I once made condensed milk ice cream and it was totally delicious and even a bit chewy!  YUM!  That's how much I like condensed milk.  I must never have it in the house, I tell you, or else I will eat WAY too MUCH and Ari will give me a disapproving glance.

So, glances aside... I give you... Yellow Box Coconut Ice. Maybe you would like to make some too?!  Who could resist, really... it is CREAMY and super sweet, just as it should be!

xx Pip


::::::


November 28, 2009

Pip's Potato Latke


2 cups of grated potato :: peel and coarsely grate the potatoes and then put in your salad spinner and spin dry :: pat dry with a paper towel if they are still a bit soggy.
1 small onion, grated as well
3 tbsp plain flour
2 eggs
salt and pepper
oil for frying :: we need to shallow-fry in around an inch of oil
Optional extra ingredients:: clove of garlic, freshly chopped herbs, grated lemon rind, smoked paprika, chilli

NB :: don't let your grated potato sit around - it will go brown and yicky - grate and use it straight away.

Mix the grated, dried potato with the other ingredients (except the oil).

Heat the oil until a pinch of the mixture fries up nice and golden quickly. Now plonk spoonfuls of your potato mixture into the oil and flatten with a spoon until a cm or so thick. They don't need to be perfect - kind of poke the spoon into the centre of the plonked mixture to make a few little holes for the oil to seep up into. This helps the middle cook evenly. No one likes raw potato! Cook until golden and then flip over and cook the other side. Drain on kitchen towel and transfer to the oven to keep warm. These are nice cold too, though!

November 20, 2009

Simplicity Chocolate Cake - via NMAA


I made this today. It turned out great. I used a bit more butter and dutch cocoa and a tablespoon of espresso instead of instant.


2 tbsp butter
2 tbsp cocoa
1 cup SR flour
1 cup sugar
1/2 cup milk
2 eggs
1/2 tsp vanilla extract
1/2 tsp instant coffee

Grease a ring tin very well and heat oven to 350F

Cream butter and sugar. Add eggs. Add cocoa, vanilla and coffee. Add flour and milk alternately. Bake for 30 mins. Cool in tin and then turn out.

Upside Down Pear Cake


3 pears, peeled, halved and cored
175g butter
175g caster sugar
175g self raising flour
3 eggs
3 tablespoons of milk

grease and line your 20cm cake tin with baking paper. preheat oven to 180C.

Cream butter and sugar together. Add eggs one at a time. Fold in flour, then milk.

Place pears into bottom of the lined tin. Spoon mixture evenly over top of pears and smooth out.

Bake for 45minutes. Let sit for 5 minutes and then turn out onto serving plate.

Y to the UM.

via Eat Drink Live by Fran Warde

Chocolate Apricots


250g Callebaut dark chocolate or other high quality chocolate
250g dried apricots

Melt chocolate in microwave in 30 second bursts - stirring well between each burst. Be careful not to heat it too much or too often as it will separate. Yick. Now when it's melty and smooth spear your apricots with a fork and dip into the chocolate until well coated. Pop onto some wax paper to cool - in the fridge if it's hot at your place. Eat when set. Try not to eat too many. It is VERY hard!

September 10, 2009

:: Warm Roasted Pumpkin Salad


Illustration : Joseph Giordano


1kg of pumpkin - cut into 1" chunks or thereabouts
1 onion, chopped roughly
1 cup of frozen peas
2 cobs of fresh corn, kernels removed (just cut them off roughly with a knife)
1 clove of chopped garlic
some sprigs of thyme or whatever fresh herbs you have
a good slosh of olive oil
salt and pepper
a teaspoon of sweet paprika
juice of a lemon

Combine all ingredients and mix well. Plonk onto an oven tray, slosh on some more oil and cook in a medium oven for half an hour to forty minutes (or until the pumpkin has a bit of colour and is nice and tender)

Serve warm - or let it cool and serve cold. You could throw some chopped pinenuts or cashews through this and it'd be nice too!